
I’m sure that a lot of veteran Google Analytics Ninjas would be familiar with the Google Analytics Query Explorer.
This wonderful tool, allows you to create and compile URI calls relatively quickly, and in my humble opinion, I prefer it over using the Google Analytics interface to get some data.
The query explorer compiles an API Query URI that would look something like this:
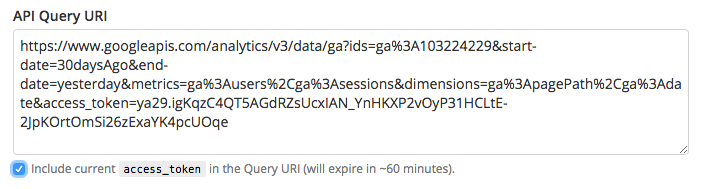
The eagle-eyed analysts would have realised that the access_token expires generally around 60 minutes so this blog will teach you how to re-generate the access_token in 7 easy steps!
Most of the tokens in this example have been changed or disguised.
Part 1: Create an oAuth ID (Other)
- Go to: https://console.developers.google.com
- Create a new project
- Enable the “Analytics API”
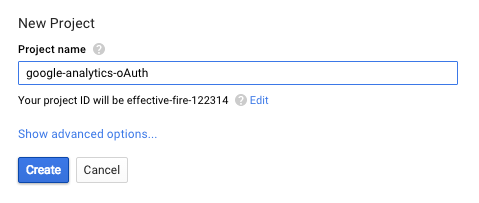
New project creation Go to credentials
- Create “oAuth Client ID”
- Configure (Other) and save
- Give it a name
- Save the client ID and client secret
- Download the JSON
Part 2: Compile the following URI call from the JSON
|
1 2 3 4 |
https://accounts.google.com/o/oauth2/auth?scope=https://www.googleapis.com/auth/analytics &redirect_uri=YOUR_REDIRECT_URI_HERE &response_type=code &client_id=YOUR_CLIENT_ID_HERE |
Copy the client ID from the JSON into the URI to become:
|
1 2 3 |
https://accounts.google.com/o/oauth2/auth?scope=https://www.googleapis.com/auth/analytics &redirect_uri=urn:ietf:wg:oauth:2.0:oob &response_type=code&client_id=390486569115-blq2iuvpkt5kmipgnben5ij.apps.googleusercontent.com |
Call the above URI.
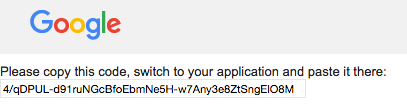
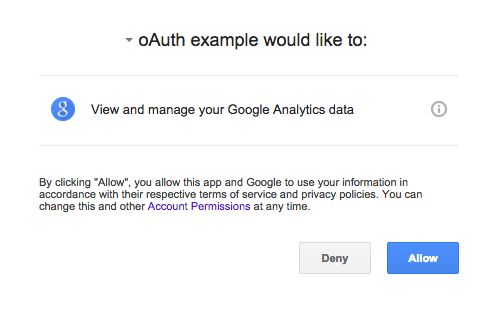
Part 3: If done right… you will get this screen. Answer ALLOW!
Google will then issue you with this token – it may only be used once.
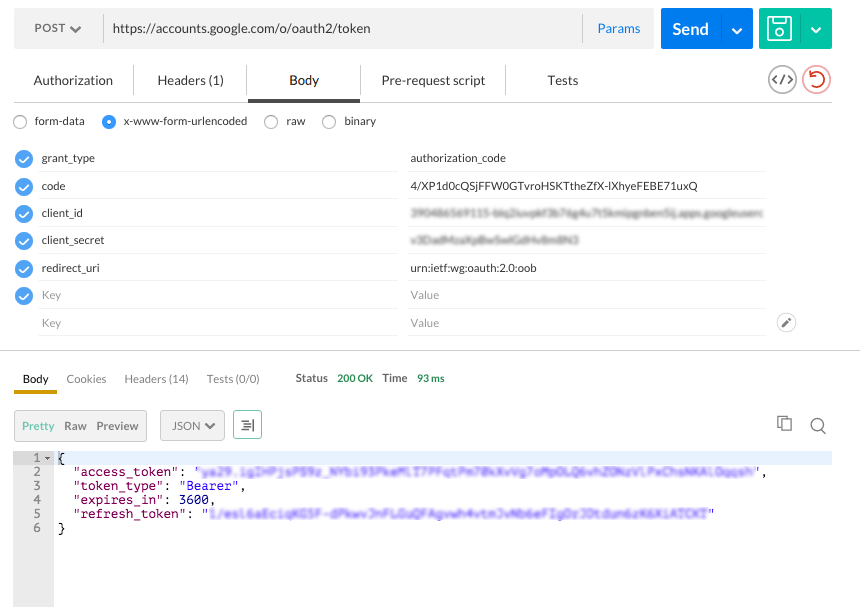
Part 4: Open up Postman – or download it at www.getpostman.com
Make a POST call to: https://accounts.google.com/o/oauth2/token
With the following parameters:
HEADER:
- Content-Type: application/x-www-form-urlencoded
BODY:
- grant_type: authorization_code
- code: 4/XP1d0cQSjFFW0GTvroHSKTtheZfX-lXhyeFEBE71uxQ (important code from before)
- client_id: YOUR CLIENT ID from setup
- client_secret: YOUR CLIENT SECRET from setup
- redirect_uri: urn:ietf:wg:oauth:2.0:oob
Part 5: If done right, you will get a happy POSTMAN
Part 6: Use the access_token to access any Google Analytics API URI
For example, you may now call, and the data will come back in JSON format.
|
1 2 |
https://www.googleapis.com/analytics/v3/data/ga?ids=ga%3A663604&start-date=2015-01-18&end-date=2015-02-17&metrics=ga%3Ausers &access_token=ya29.igIHPjsPS9zFqtqqsh |

Part 7: You can refresh the token using the refresh_token
Tokens usually last for around 60 minutes so be sure to build an error handler.
|
1 2 3 4 |
https://accounts.google.com/o/oauth2/token?client_id=CLIENT_ID &client_secret=CLIENT_SECRET &refresh_token=REFRESH_TOKEN &grant_type=refresh_token |
For the lazy, below is what the code could look like. Of course, the implementation could be done in many other ways.
|
1 2 3 4 5 6 7 8 9 10 11 12 13 14 15 16 17 18 19 20 21 |
function tokenRefresh(){ var uri = "https://accounts.google.com/o/oauth2/token"; var payload = { 'client_id' : '649931943184-99g3fff0iusn0ult3.apps.googleusercontent.com', 'client_secret' : 'nHO1O5FFJHDKFSFD21qK', 'grant_type' : 'refresh_token', 'content_type' : 'application/x-www-form-urlencoded', 'refresh_token' : '1/w11DAITtcJFKLSJHOIuo1wXwqz_cacucPuM' }; var options = { "method" : "POST", "payload" : payload }; var response = UrlFetchApp.fetch(uri, options), response_json = JSON.parse(response.getContentText()), token = response_json.access_token; return(token); } |